Auth - Adding Google, Facebook, and Apple
This page shows how to set up each provider for OAuth authentication with Supabase and GoTrue. We are going to use our website calmlykids.app or www.3dnames.co as examples in this document
How does this work?
Frontend-wise, we are now using a multi-auth box component to handle the authentication process. This component is designed to handle the following sign-in methods as an "all in one" solution:
- Register/Signin with Google
- Register/Signin with Facebook
- Register/Signin with Apple
- Register/Signin with Email & Password
- Register/Signin with Email via Magic Link
- Register/Signin with Email and 6-digit code
- Forgot Password via Email via Magic Link
- Forgot Password via Email and 6-digit code
It attempts to make Register and Sign in part of the same process flow, but if the user is not found, it will create a new user. For example, if you try to register but already exist, it will just sign you in. If you do not exist yet, it will create the account.
Supabase can automatically link identities that share the same verified email address, so in many cases Apple, Google, Facebook, and Email/Password sign-ins for the same user will end up on the same account. However, this depends on Supabase's identity-linking safety rules, so do not assume every matching email will always merge in every edge case.
No more individual Login.tsx or Register.tsx components to manage, but instead a single MultiAuthBox component to handle all the authentication methods.
Please note - the form below is an example of our MultiAuthBox component. It has been pinched from another website as a demo only here, and has not been configured for this website yet, so it does not work (yet).
This document does not explain how to link up the Supabase Email & Password authentication to the MultiAuthBox component. Only the Google, Facebook, and Apple setup and configuration is covered here.
What you will already have
- A Supabase project already created, configured and running on your server
- Access to your Supabase stacks .env file and docker-compose.yml file
- A Frontend NextJS website using the MultiAuthBox component
Google OAuth Setup
🔎 🔎 🔎 Google is the easiest one of the three providers, and usually requires the least setup
First you need to navigate to: Google Cloud Console and create a new project.
Then in your project navigate to: APIs & Services -> OAuth Consent Screen and create your OAuth configuration.
You do not strictly need a brand new Google Cloud project for every single app or service, but I strongly recommend using a separate project per product to keep credentials, consent screen settings, branding, and redirect URIs tidy and easier to manage.
For the client, create it as a Web Application and add the following details as per the image below, changing the 3dnames.co domain to your own domain.
Authorized JavaScript origins: Add your frontend website URLs, for example http://localhost:3000, http://localhost:3001, and https://calmlykids.app. You can remove old localhost entries later if you want, but keeping them for development is usually fine.
Authorized redirect URIs: Add your Supabase Auth callback URL, for example https://api-supabase.calmlykids.app/auth/v1/callback.
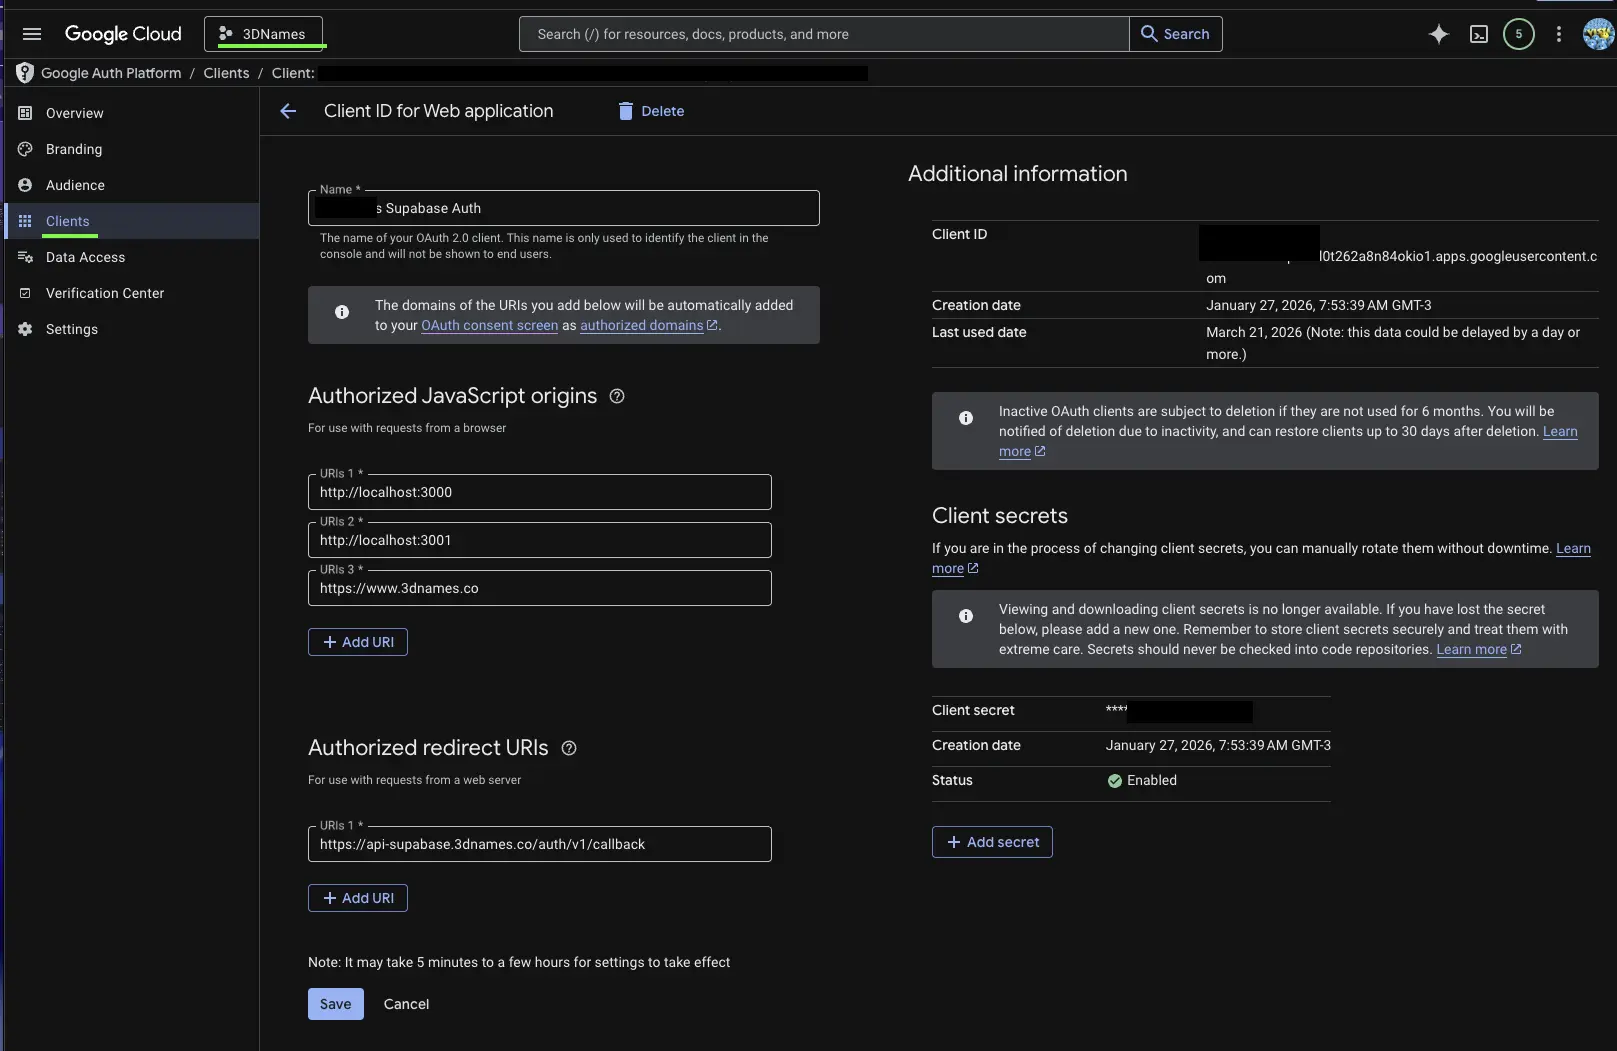
DO I NEED TO PUBLISH? Google can be fairly forgiving here if you are only requesting the basic sign-in scopes such as email/profile/openid, so authentication may work before you fully publish the app. However, you should still complete the Branding / Consent Screen setup properly so the app is production-ready and easier to review later.
IMPORTANT: For self-hosted Supabase, the provider callback URL is built from your API_EXTERNAL_URL, so the Google redirect URI should point to your Supabase Auth callback, not directly to your frontend page.
Once you have your Client ID and Client Secret, you can update your stacks .env file with the following values:
GOOGLE_CLIENT_ID=YOUR_CLIENT_ID
GOOGLE_CLIENT_SECRET=YOUR_CLIENT_SECRET
And in the stacks docker compose make sure you have these added under the services: auth: environment section:
services:
  auth:
    environment:
      # Google OAuth settings
      GOTRUE_EXTERNAL_GOOGLE_ENABLED: "true"
      GOTRUE_EXTERNAL_GOOGLE_CLIENT_ID: ${GOOGLE_CLIENT_ID}
      GOTRUE_EXTERNAL_GOOGLE_SECRET: ${GOOGLE_CLIENT_SECRET}
      GOTRUE_EXTERNAL_GOOGLE_REDIRECT_URI: ${API_EXTERNAL_URL}/auth/v1/callback
Restart your Docker Auth Service:
cd ~/Develop/ubuntu-home-server/stacks/11-supabase-stacks/calmlykids-stack
docker compose restart auth
Facebook OAuth Setup
👦🏻 📕 Facebook is probably the most awkward one to add. You may need to go through App Review, and Meta's dashboard can be a bit fiddly compared with Google.
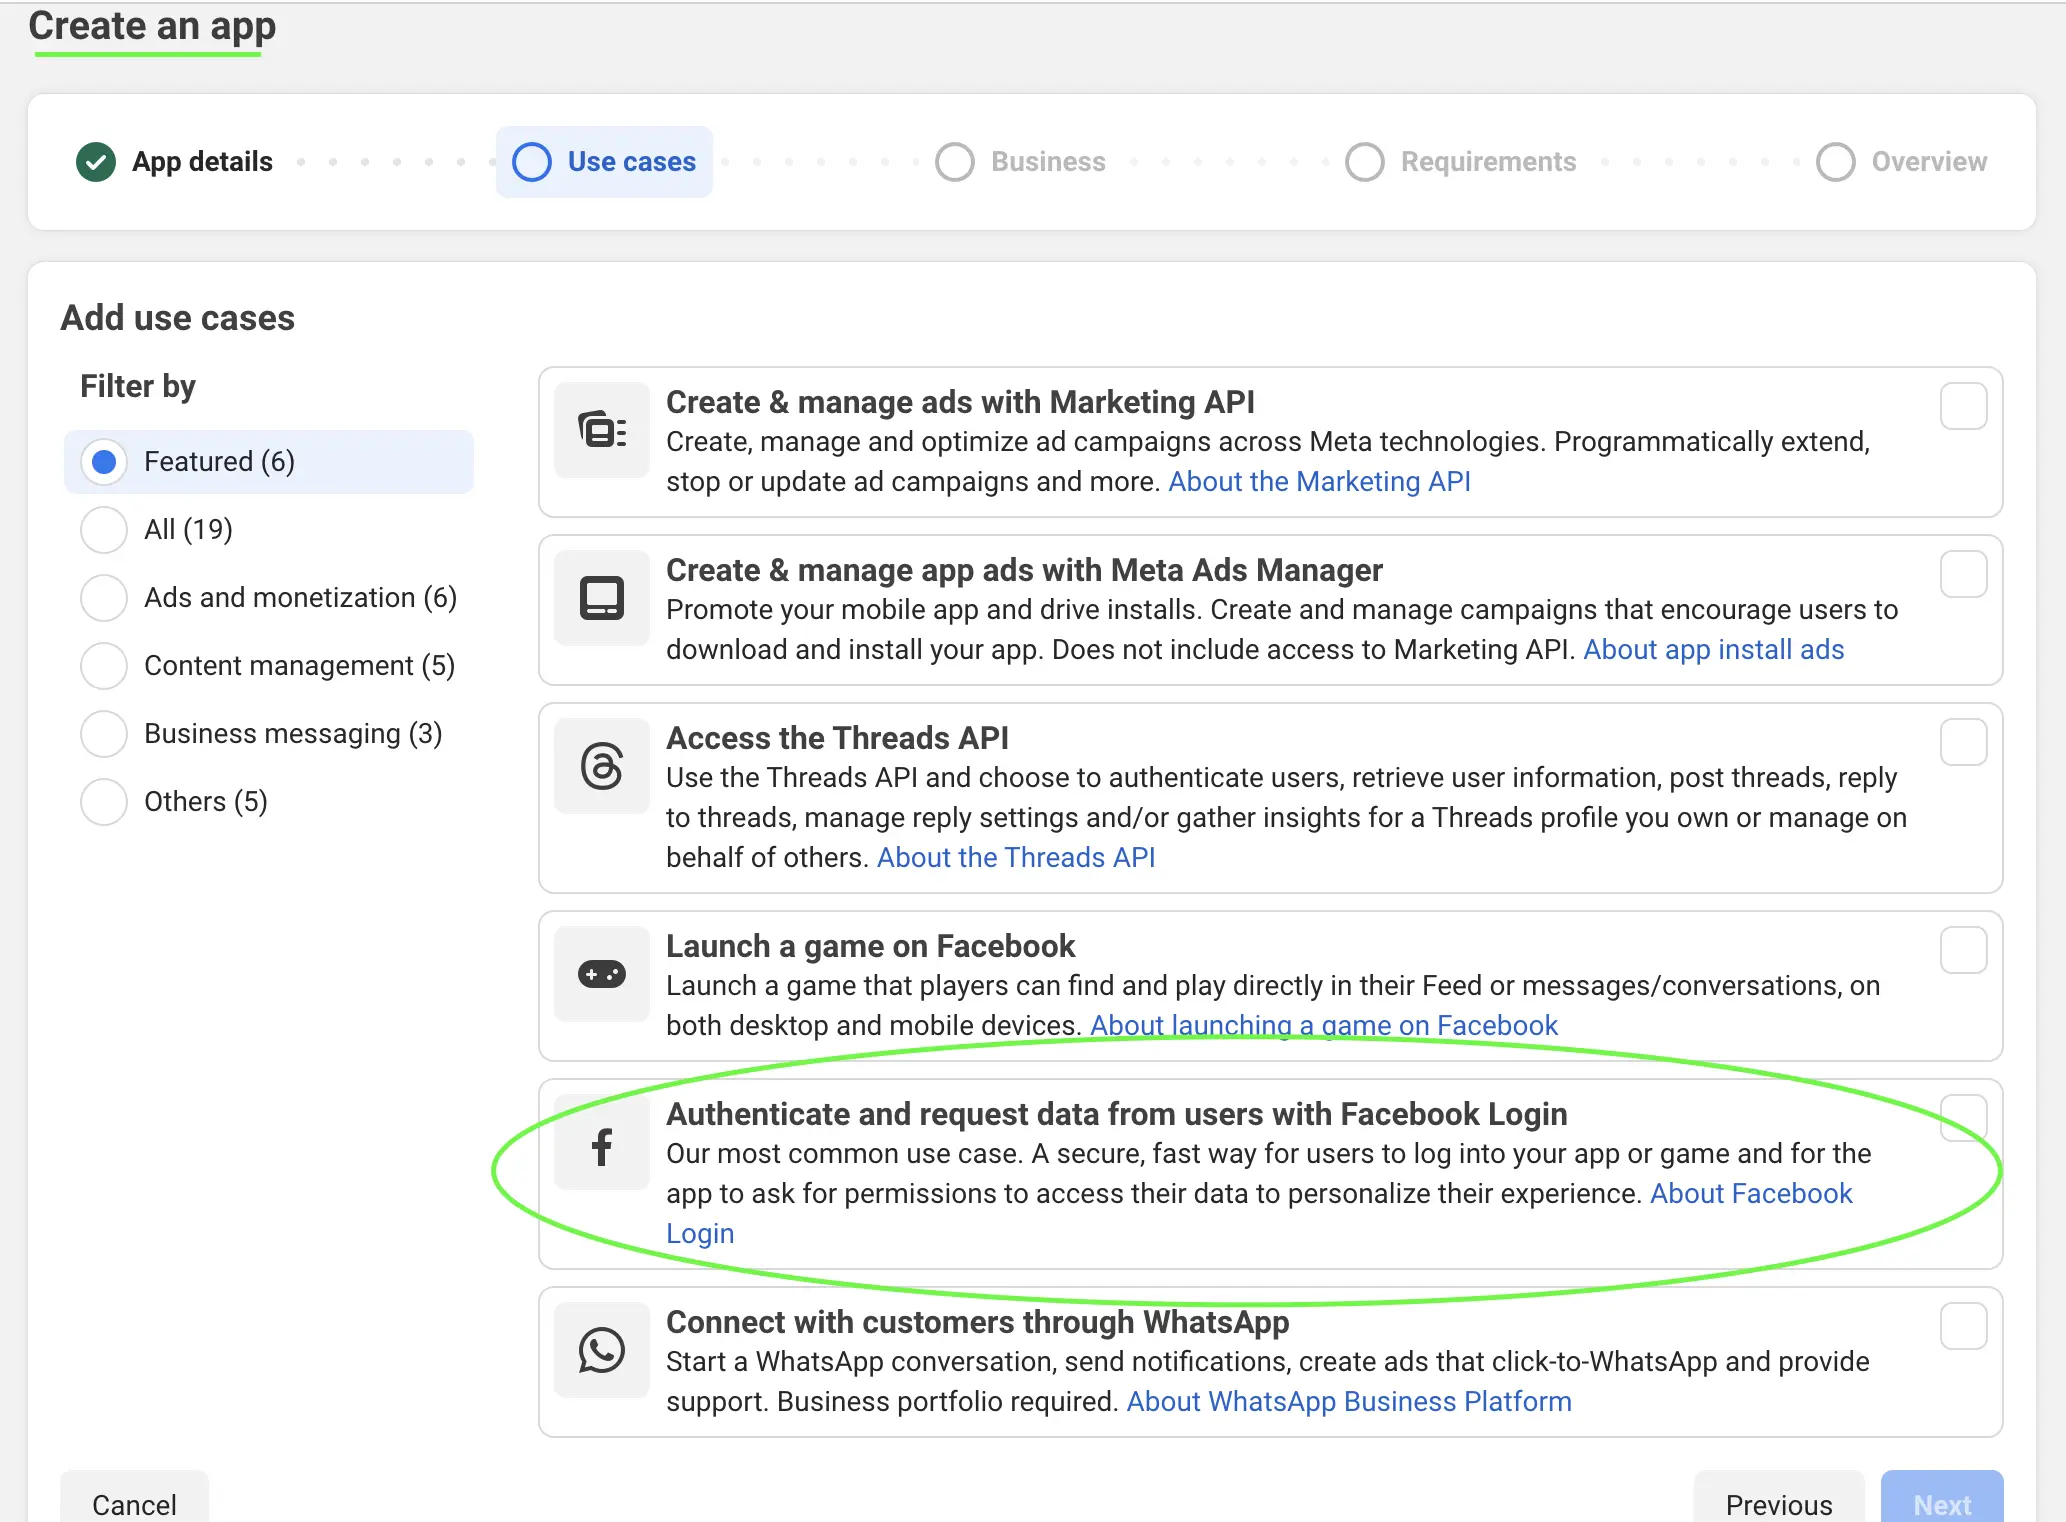
- Create a new App and choose "Authenticate and request data from users with Facebook Login" for the use case.
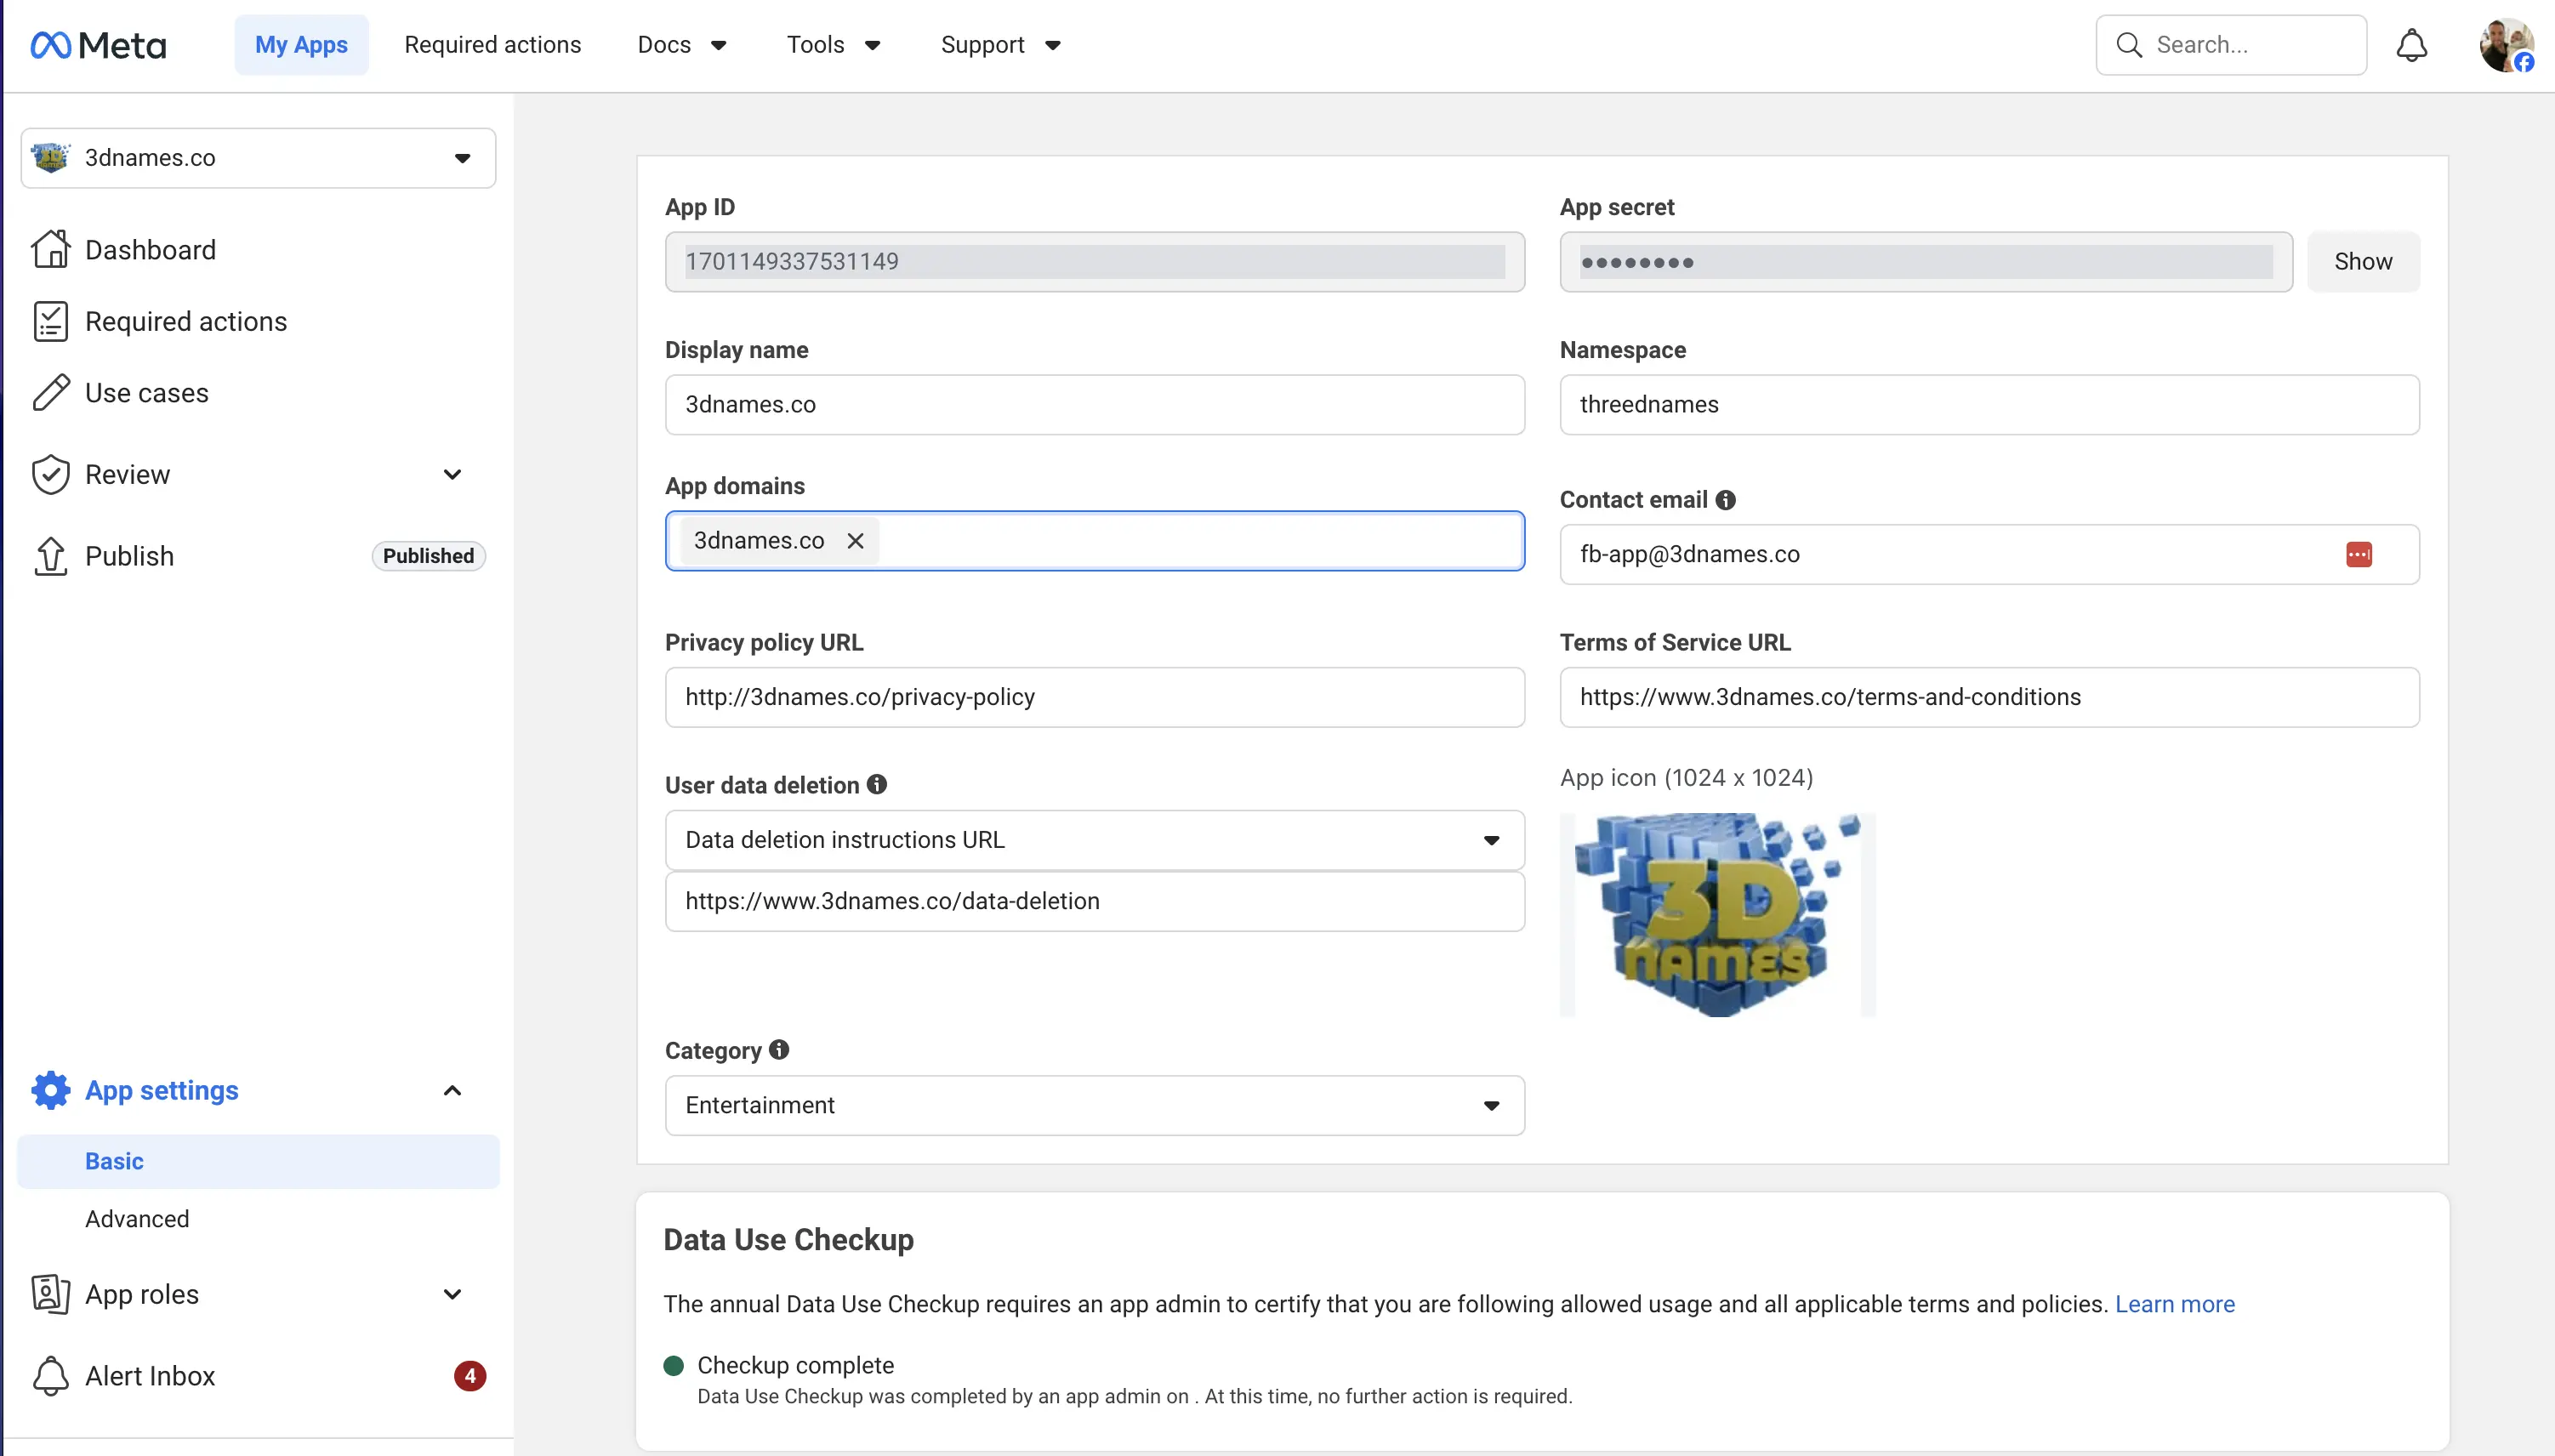
- In App Settings -> Basic, add an icon and update the Privacy Policy and Terms of Service URLs to your own.
- Copy the App ID and App Secret from the Basic settings page.
- Click "+ Add Platform" and select Website.
- Add your domain and also fill out the testing instructions explaining how the login can be tested.
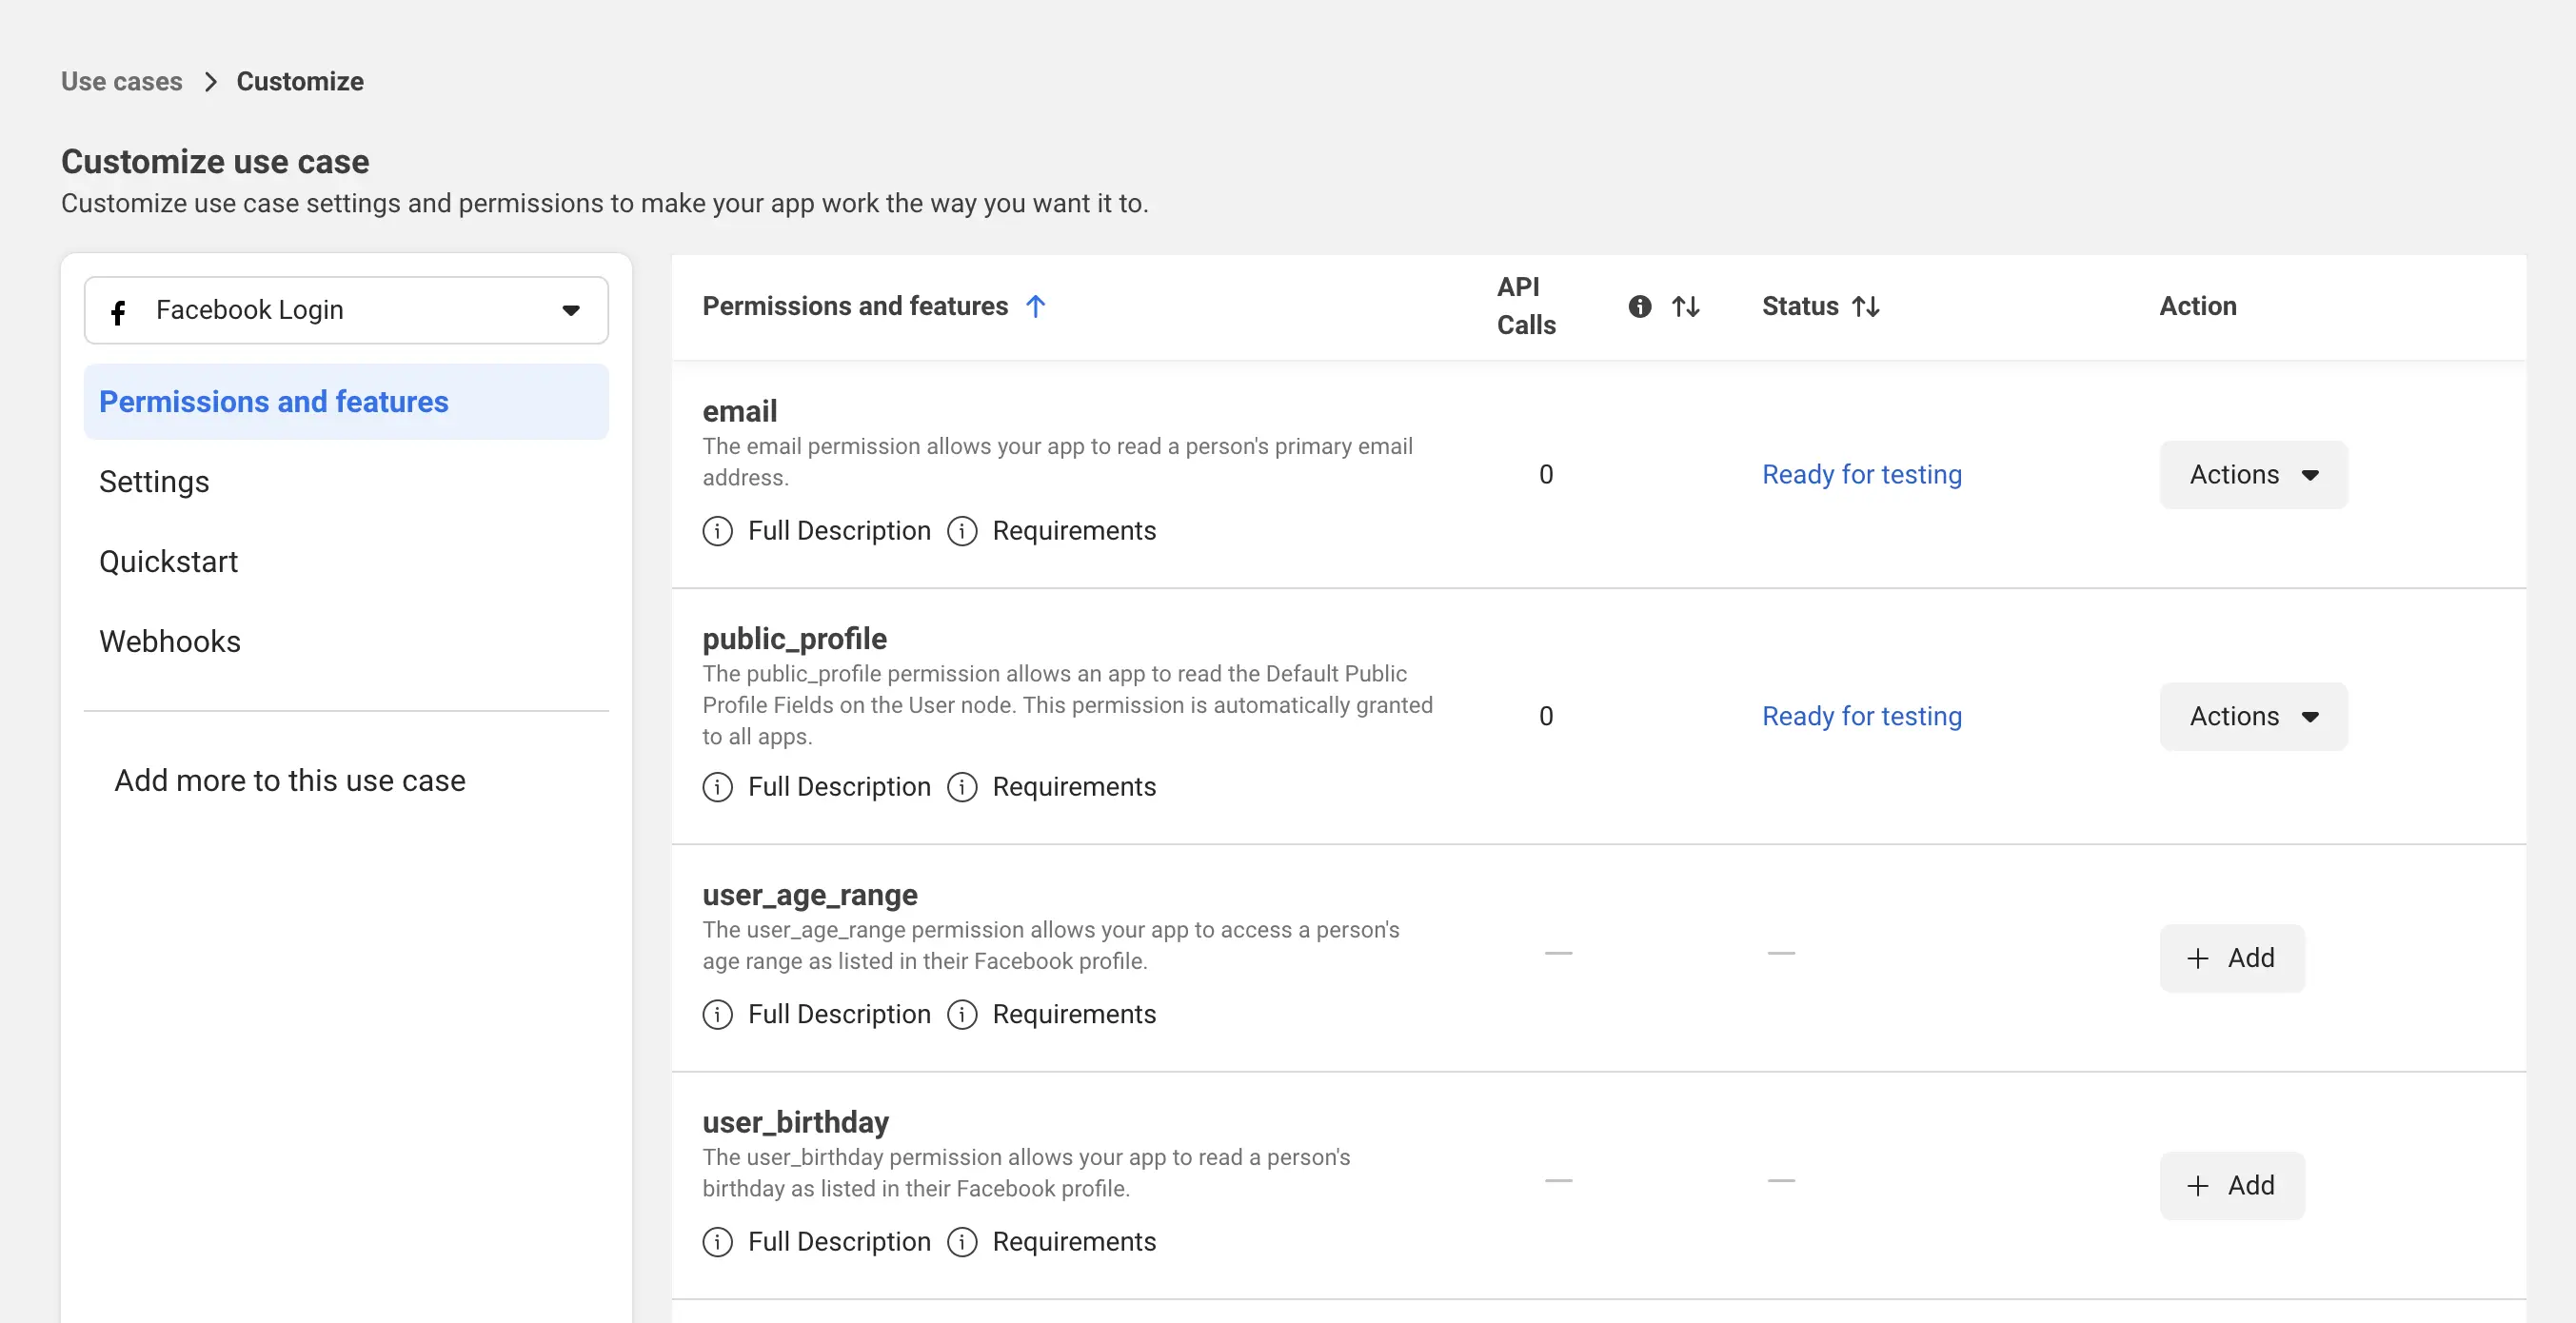
- Click Use Cases in the left menu, then under "Authenticate and request data from users with Facebook Login" click Customize.
- Under Permissions & Features, we only want
emailandpublic_profile. You only need more if your app genuinely requires them.
- In Facebook Login -> Settings, add your Supabase Auth callback URL, for example
https://api-supabase.yourdomain.com/auth/v1/callback, as a Valid OAuth Redirect URI.
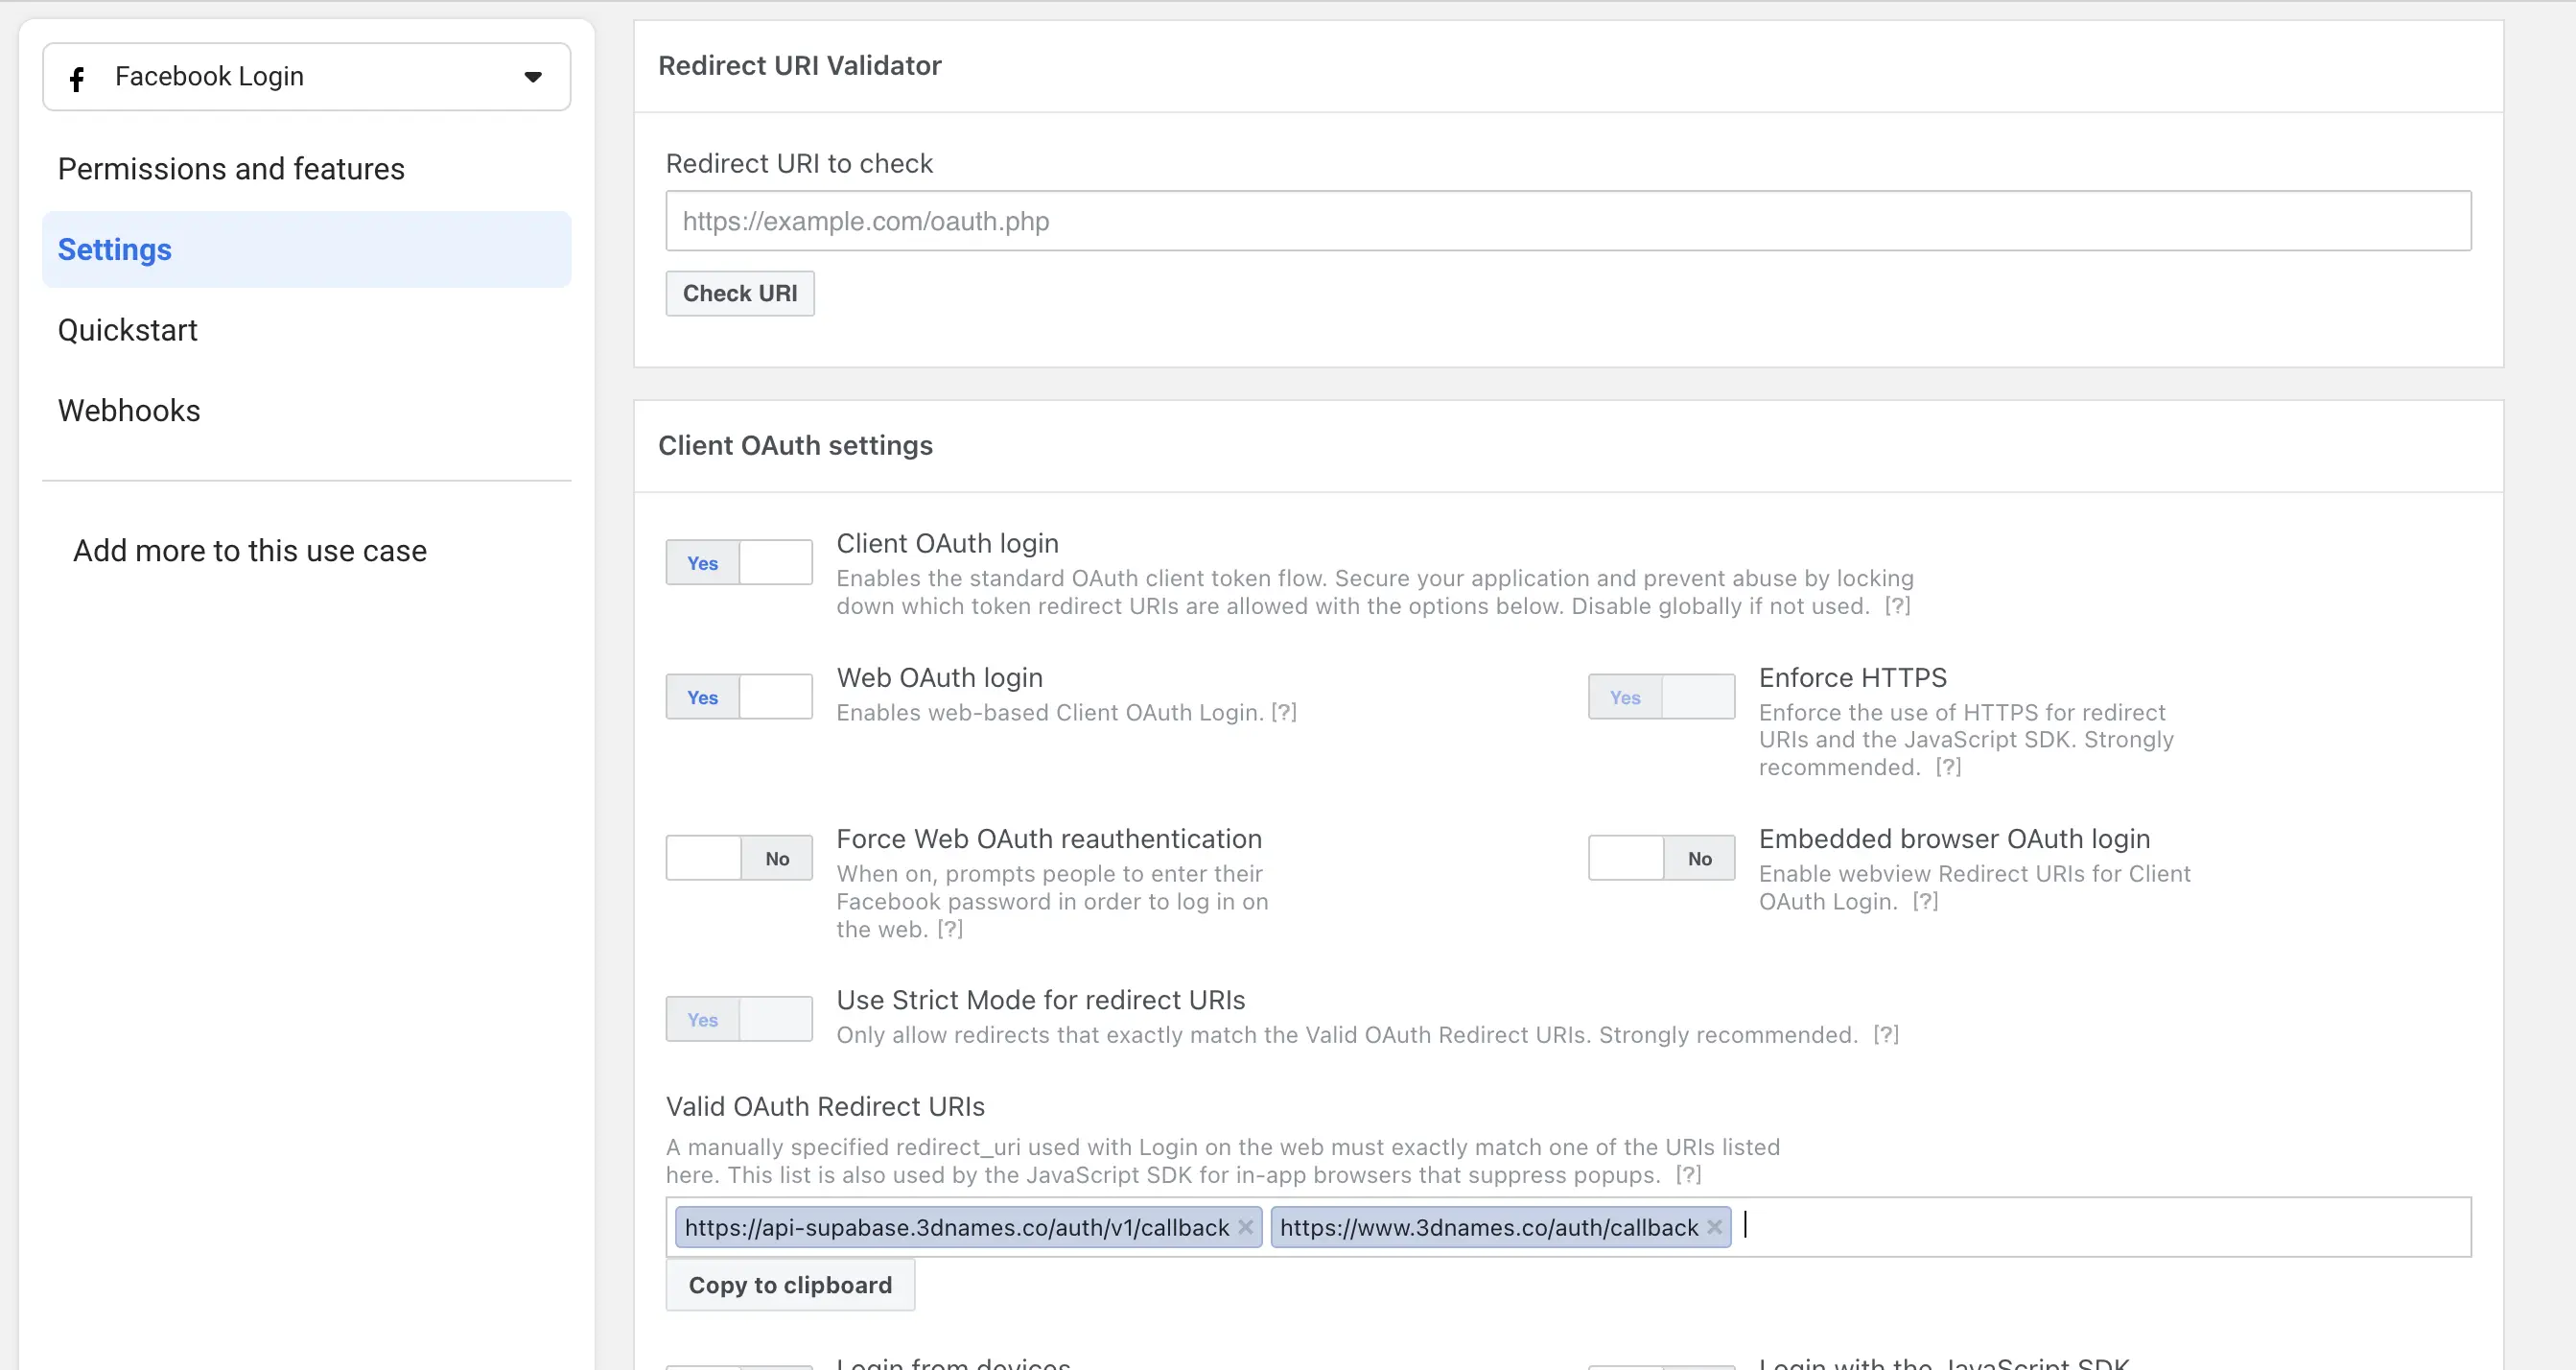
If you are using Supabase Auth to handle the OAuth flow, the critical provider redirect URI to add at Facebook is the Supabase callback URL, not your frontend /auth/callback page.
Your frontend page such as https://www.yourdomain.com/auth/callback is usually used as the final redirect destination from Supabase after login, controlled by your SITE_URL, allowed redirect URLs, or redirectTo value.
App Review Questions:
- Do you have data processors or service providers, including your own companies, that will have access to the Platform Data that you obtain from Meta? = No
- Who is the person or entity that will be responsible for all Platform Data Meta shares with you? = Vista Studios Ltd
- Select the country where this person or entity is located. = Brazil
- Have you provided the personal data or personal information of users to public authorities in response to national security requests in the past 12 months? = NO
- Which of the following policies or processes do you have in place regarding requests from public authorities for the personal data or personal information of users? Check all that apply. = Check the first 4 boxes
Now grab the App ID and App Secret from the App Settings -> Basic section, and update the Linux server .env file with:
FACEBOOK_CLIENT_ID="YOUR_APP_ID"
FACEBOOK_CLIENT_SECRET="YOUR_APP_SECRET"
And in the stacks docker compose make sure you have these added:
services:
  auth:
    environment:
      # Facebook OAuth settings
      GOTRUE_EXTERNAL_FACEBOOK_ENABLED : "true"
      GOTRUE_EXTERNAL_FACEBOOK_CLIENT_ID: ${FACEBOOK_CLIENT_ID}
      GOTRUE_EXTERNAL_FACEBOOK_SECRET: ${FACEBOOK_CLIENT_SECRET}
      GOTRUE_EXTERNAL_FACEBOOK_REDIRECT_URI: "${API_EXTERNAL_URL}/auth/v1/callback"
Restart your Docker Auth Service:
cd ~/Develop/ubuntu-home-server/stacks/11-supabase-stacks/calmlykids-stack
docker compose restart auth
DEV MODE GOTCHA: While your Facebook app is in Development mode, only users added as Developers, Testers, or other allowed app roles will be able to sign in. For normal public users, switch the app to Live mode once your details are complete.
Callback URL sanity check
Before moving on, it helps to understand the two different types of URLs involved in OAuth:
- Provider callback URL: This is the callback URL you register with Google / Facebook / Apple. For self-hosted Supabase, this should normally be your Supabase Auth callback URL, for example
https://api-supabase.yourdomain.com/auth/v1/callback. - Final app redirect URL: After Supabase finishes the OAuth exchange, it then redirects the user back to your website using your
SITE_URL, your allowed redirect URLs, or aredirectTovalue from your frontend code.
Getting these mixed up is one of the most common causes of OAuth setup bugs.
Apple OAuth Setup
🍎 🍎 🍎 Apple is also quite complex, but once all the moving parts are in place it works reliably
Essentially, you need to create 3 things in Apple Developer:
- an existing App ID for your iOS app (we already have this for
Calmly Kids) - a Services ID for web OAuth (Client ID)
- a Sign in with Apple Key (
.p8)
Step-by-step for an existing app already in your Apple Connect account (Calmly Kids) using the existing App ID app.calmlykids
-
Go to Apple Developer -> Certificates, IDs & Profiles -> Identifiers.
-
Open your existing
Calmly KidsApp ID (for exampleapp.calmlykids) and confirm Sign in with Apple is enabled. There is no need to configure anything special here, just keep the defaults as below:- Keep "Enable as Primary App ID" checked
- Leave "Server-to-Server Notification Endpoint" blank
-
Now we need to add a Services ID
- Go to: Identifiers ->
+-> Services IDs - Under "Register a New Service ID" select Services IDs then Continue
- Identifier example:
app.calmlykids.web(or whatever you like, just make sure it's unique) , Description: "Web OAuth for Calmly Kids" then press continue - Now open that Services ID -> Sign in with Apple -> Configure
- Primary App ID: select your existing
Calmly KidsApp ID - Domains and Subdomains:
calmlykids.app - Return URLs:
https://api-supabase.calmlykids.app/auth/v1/callback - Press Next and then Save
- Go to: Identifiers ->
-
And now a Key
- Go to Keys and add a new key with
+ - Check Sign in with Apple and then click Configure
- Associate it with the correct App ID / Services ID setup for this Sign in with Apple configuration
- Press Save, then Register , then Download the
.p8file (shown once only) - Now note down your Key ID, Team ID, and Services ID
- Go to Keys and add a new key with
-
Okay, everything on Apple's side is done, so now we need to update our Supabase stack
- GOTRUE_EXTERNAL_APPLE_CLIENT_ID:
app.calmlykids.web(or whatever yours is) - GOTRUE_EXTERNAL_APPLE_SECRET: this is where we use a script to create the secret from the values noted above.
- GOTRUE_EXTERNAL_APPLE_CLIENT_ID:
So, use the joemore.dev/scripts/apple-client-secret.mjs script and copy its output value for GOTRUE_EXTERNAL_APPLE_SECRET:
node scripts/apple-client-secret.mjs \
  --team-id YOUR_APPLE_TEAM_ID \
  --key-id YOUR_APPLE_KEY_ID \
  --client-id YOUR_APPLE_SERVICES_ID \
  --key-file /absolute/path/to/AuthKey_XXXXXXXXXX.p8
IMPORTANT MAINTENANCE NOTE: For Apple web OAuth, this generated secret does not last forever. You will need to rotate / regenerate it roughly every 6 months, otherwise Apple login will suddenly stop working later on.
- Now Update your stacks
.envfile with the following values:
GOTRUE_EXTERNAL_APPLE_CLIENT_ID=app.calmlykids.web
GOTRUE_EXTERNAL_APPLE_SECRET=YOUR_APPLE_CLIENT_SECRET
Apple Sign in is a little sneaky here: if you are using the standard OAuth flow for the web, you should not rely on Apple to always provide the user's full name in a way that Supabase can automatically store for you. If you need names, it is safest to collect or confirm them separately in your onboarding flow.
- Check your
docker-compose.ymlfile, and under theservices: auth: environmentsection, add the following values if they don't yet exist:
services:
  auth:
    environment:
      # Apple OAuth settings
      GOTRUE_EXTERNAL_APPLE_ENABLED: "true"
      GOTRUE_EXTERNAL_APPLE_CLIENT_ID: ${GOTRUE_EXTERNAL_APPLE_CLIENT_ID}
      GOTRUE_EXTERNAL_APPLE_SECRET: ${GOTRUE_EXTERNAL_APPLE_SECRET}
      GOTRUE_EXTERNAL_APPLE_REDIRECT_URI: "${API_EXTERNAL_URL}/auth/v1/callback"
Restart your Docker Auth Service:
cd ~/Develop/ubuntu-home-server/stacks/11-supabase-stacks/calmlykids-stack
docker compose restart auth
🎉 Hey Presto - your Apple Auth should now work on your website!
All apple Images:
IMPORTANT: Apple only accepts HTTPS return URLs and exact string matches. If even one character is off in your callback URL, auth will fail. Also make sure the return URL registered in Apple matches your Supabase Auth callback URL exactly.